PICKING WHAT BEANS TO PLANT
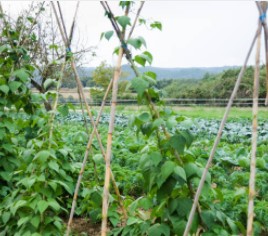
You’ll need to decide if you’d like pole beans or bush beans. You will have to set up poles for the beans to climb up, if you choose to do pole beans.
It does save space, but we like bush beans. The pole beans we’ve planted in the past haven’t produced as well and were tough and stringy.
If you want to save your seeds make sure you are buying a heirloom variety. You can’t save the seeds from a hybrid and it come back the same thing. The package will usually say if they are heirloom. Some examples of heirloom beans are; Jade, Blue Lake, Contenders, Kentucky wonder, to name a few.
A hybrid is a way the government has used to get people to rely on them for their seeds. Now many people are on food stamps. They have gotten to where they don’t grow their own food, and don’t know how to.
Wherefore do ye spend money for that which is not bread? and your labour for that which satisfieth not? Isaiah 55:2
And having food and raiment let us be therewith content. 1 Tim.6:8
PLANTING YOUR BEANS, Directly in garden
The first step in planting green beans is to, first decide the size of your bed. Then prepare your soil by loosening with a garden rake or hoe. Make sure to leave walkways/picking path between wide rows. Once you have prepared your soil, sprinkle your green bean seeds making sure your seeds are at least 1” apart. When you are finished with this, push them down ¼”-½” then put a thin layer of compost or manure on top. Water.
We don’t plant in a single row, we plant our beans in a square or rectangle. It allows you to get more beans in a smaller space. Planting them this way also cuts down on weeds.
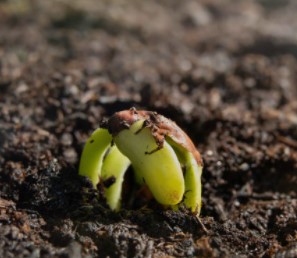
If it rains after you have planted your beans, the rain may have washed your beans seeds up. Just push them back down or cover with more compost. Your beans should sprout in 7-14 days.
GROWING AND CARING FOR YOUR BEANS
Make sure to keep your plants watered in the dry season. Only water your beans in the morning or once it has cooled down in the evening, because you will shock your plants if you water them in the heat of the day. Make sure not to water them too much, because it can cause fungus. Most of the time if you water 3-4 times a week they’re okay.
If your bean plants start turning a pale green/yellowish color they need nitrogen. Put manure around your plants.

HARVESTING YOUR GREEN BEANS
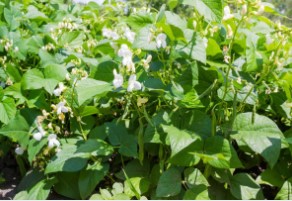
Once your beans start to bloom it will be about 2 weeks until they are ready to harvest. If you’ve already been picking, and you’re not seeing anymore blooms add more compost. Then, the plants will start blooming again.
We usually get 3-4 good pickings off our beans, then we let the rest go to seed.
You can harvest the green beans at your desired length. Some people like their beans long and fat, others like them thin and tender, its up to you.

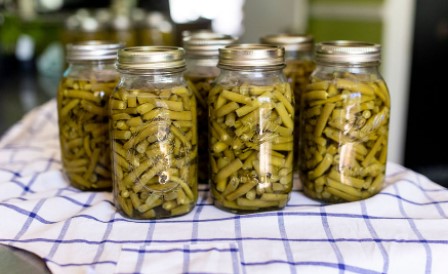
CANNING YOUR BEANS
Canning your beans might seem intimidating, but it’s not as hard as it sounds.
With Yehovah all things are possible. Mat. 19:26
PREPARING FOR CANNING
After you have picked your green beans, remove the stems and tails. Snap them however long you like. Wash your beans in a sink of cool water.

Fill your clean jars with your green beans, then add 1 teaspoon of real salt (salt is optional it just adds more flavor and real salt adds minerals too.).
Fill your jars with water leaving 1” head-space. (Headspace is the space between the top of the food/water and the rim of the jar.)

Slide a butter knife down the side of your jars to remove air bubbles.
Wipe the rim of your jar to remove any salt that will prevent your jar from sealing.
Place the lids and rings on your jars. (Some people like to heat their lids in boiling water first.) Screw your rings on tightly.
PREPARING YOUR PRESSURE CANNER & CANNING YOUR BEANS
Fill your canner ¼ way with water. Put your filled jars in your canner. Put on and latch your canner lid.
Turn your burner on high. DO NOT USE A FLAT TOP ELECTRIC RANGE. IT WILL CRACK THE TOP!

DO NOT LEAVE YOUR CANNER!
Once steam starts coming out of your canner’s vent pipe set the timer for 10 minutes.
When timer goes off, place your weight on the vent pipe. The pressure will start to build. When pressure gets to 10 psi, turn your canner on low to keep it at 10 psi. Set timer for 25 minutes.
MAKE SURE TO KEEP YOUR CANNER AT 10psi. You may have to shut off your burner and then turn it back on.
When timer goes off, turn canner off and let cool.
CAUTION! DO NOT REMOVE YOUR CANNER LID OR WEIGHT UNTIL YOUR CANNER HAS COOLED AND RELEASED THE PRESSURE. YOUR REGULATOR WILL BE AT 0, WHERE IT STARTED.
Once pressure has released from your canner, remove your weight from your lid. Make sure you put it somewhere you won’t lose it. Then remove the lid. Open lid turning it away from you, so you do not get steam burn.
Place a towel on the counter, with jar lifter carefully take your jars out of the canner. Place them on the towel. Some jars will seal after you remove them from the canner.
CAUTION! DO NOT PUT ANYTHING ON TOP OF YOUR JARS. It will cause them to unseal.
Once the jars are cooled, check them to make sure they all sealed (gently tap the lid and listen to the sound, if one sounds hollow and the top clicks when pushed; its not sealed) if they are sealed remove rings and store the jars.
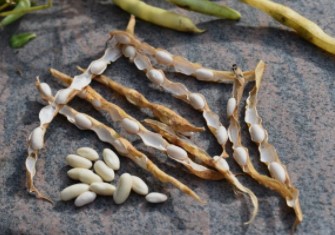
SAVING GREEN BEAN SEED
Leave your green beans on your plants until your pods are dry. Usually your plants are dead when your pods are dry enough. Pick your pods and take your seeds out. Lay your seeds on a cookie sheet or tray to finish drying. Once they are dried, store in a dry jar with a air tight lid. If your jar or seeds are not dry or if moister get in your jar, your seeds will mold.
If you plant enough every year, to eat fresh, can, and save seed, you’ll never have to buy seeds again!
Green beans are one of the easier things to grow. It’s a great place to begin gardening. I pray that this will be an encouragement to you to start to grow your own food. I hope this will be helpful.

