
Planting, Harvesting, Canning, and Saving Seeds
Planting Beets in Trays
First you will need to have your planting tray ready. Pour your soil on your tray. Push soil into the cells of your tray. Sprinkle with water. When you are finished, put 4 to 5 beet seeds in each cell. Put your soil on top. Make sure your soil is not too deep, or your seedlings will not come up. Water again, and water your seeds each day. They should sprout up in about 7 to 14 days after planting.
The reason why we plant them like this is because it saves on space and it allows the root to get bigger and they grow better together.
Note: If the seedlings get long and spindly, just replant them deeper.
In 2 to 3 weeks you should be able to plant them outside. Make sure it is after the first frost, so that they do not get killed by frost. When you plant them outside, give them space to get big, about 6-8 inches apart. Keep watered, in the dry season.

Harvesting your Beets
Honor Yehovah with thy substance, with the first fruits of all thine increase. Proverbs 3:9
We seek to obey the Father and give our first fruits away in order to obey His word. We have seen His faithfulness in abundantly blessing, our harvest, since obeying the Scriptures, just like in all areas of life where we seek to obey.
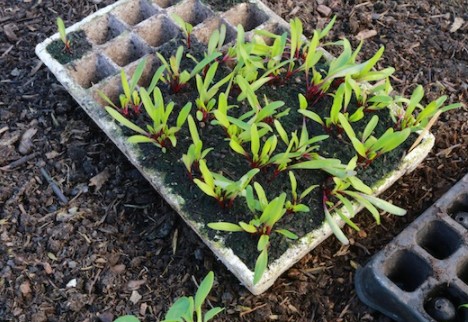
When your beets look like the picture below, pull them up, taking the biggest out so that the smaller ones can continue to grow. Cut off the tops/greens of your beets. You can saute the greens, see recipe here, or compost them.
A word of caution: If you are prone to kidney stones be aware that many stones are formed from an anti-nutritent called oxalate. Spinach contains the highest amount of oxalate, however beets contain some as well. To help bind the oxalate, you can eat something with calcium, beet and cottage cheese is good!

Preparing your beets for canning
Put a pot of water on to boil. Keep the the long tap root on the beet for now. Wash your beets in the sink, and when your water comes to a boil, put your beets in the boiling water for 10 to 20 minutes, or until the beets skins’ are coming off and you can stick your knife in the beet and it is soft.
When your beets are ready to cut, carefully take the beets out of the pot of boiling water and put them on a cookie sheet. Let cool. When cooled, cut off the tap root, take the skins off, and slice your beets into whatever size you want.

Canning your Beets
Some folks like pickled beets. Here is a link to our Pickled Beets Post.
The instructions below are for canning beets, without pickling.
Get your presser canner and put it on the stove. Fill with water 1/4 to 1/2 full, and turn canner on low. You are going to need to turn your oven on warm, or the lowest setting it will go to heat your jars. The reason you need to have your jars hot, is so that when you put your hot beets and boiling water in, your jar won’t break.
When your jars and canners’ water are hot, and beets are sliced, ladle your beets and hot boiling water into the jar, leaving 1 inch head space at the top.

Remove air bubbles by sliding a knife down the sides of the jar. Wipe jar rim and put lid and ring on tight.
Turn your burner on high. DO NOT USE A FLAT TOP ELECTRIC RANGE IT WILL CRACK THE TOP.
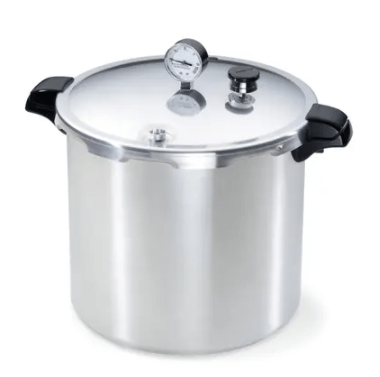
DO NOT LEAVE YOUR CANNER!
Once steam starts coming out of your canner’s vent pipe, set the timer for 10 minutes.
When the timer goes off, place your weight on your vent pipe. The pressure will start building. When pressure reaches 10psi turn your canner on low to keep it there. Set the timer for 35 minutes for quarts, and 30 minutes for pints.
MAKE SURE TO KEEP YOUR CANNER AT 10psi. You may have to shut off your burner and turn it back on.
When the timer goes off, turn off your burner and let your canner cool.
CAUTION! DO NOT REMOVE YOUR CANNER LID OR WEIGHT UNTIL YOUR CANNER HAS COOLED AND RELEASED THE PRESSURE. YOUR REGULATOR WILL BE AT 0, WHERE IT STARTED.
Once the pressure has released from your canner remove the weight from the lid. Make sure you put it somewhere you won’t lose it. Open the lid turning it away from you, so you don’t get steam burnt.

Place a towel on the counter, and carefully lift your jars out of the canner with a jar lifter, and place them on the towel. Some of your jars will seal after you remove them from the canner.
CAUTION! DO NOT PUT ANYTHING ON TOP OF YOUR JARS. It will cause them to unseal.
At this point, we used to cover our jars with a towel. However, we’ve since learned that you want the jars to come out of the canner and be exposed to the quick temperature change in order to seal.
Once your jars are cooled, check to make sure they all sealed (gently tap the lid and listen to the sound, if one sounds hollow and clicks when tapped it’s not sealed) if they are sealed, remove the rings and store the jars.
Saving Beet Seeds
If you want to save your seeds make sure you are buying a heirloom variety. You can’t save the seeds from a hybrid and it come back the same thing. The package will usually say if they are heirloom. Some examples of heirloom beets are Detroit Dark Red, Sangria, Sweetheart, Ruby Queen, to name a few.
A hybrid is a way the government has used to get people to rely on them for their seeds. Now many people are on food stamps. They have gotten to where they don’t grow their own food, and don’t know how to. We hope reading this post will encourage and teach you how to.
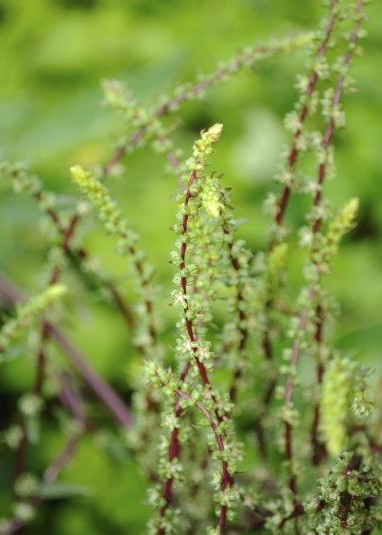
Step one, do not harvest some of the beets that you planted. Keep them in the ground over the winter. They should start greening up on the spring. As they grow, they will start getting flowers on them, like the picture below.
By late summer/ early fall you should see the flowers die, and the seeds appear. You’ll recognize them by the seed you planted in the ground. The seed will dry out on the plant turn brown/tan, and you can then harvest the seeds. Cut the “spikes” and put them in a brown paper bag to finish drying for a couple weeks.
Store your seeds in a cool dry place for the winter.

Wherefore do ye spend money for that which is not bread? and your labour for that which satisfieth not? Isaiah 55:2


Good info….thank you!
LikeLike
Thanks for the encouragement! We’re glad you liked the post.
LikeLike