Working with Wool Part. 2 Combing and carding

Step 1 Combing your wool

Now that your wool is washed and dried, it’s time to comb. Combing your wool really helps in getting your wool cleaned from any leftover Vegetative Matter. (You can skip this step if you have clean wool, if you’d like and go right to carding.)

To begin, take a lock of wool and put it on one of your combs,and run your empty comb through your wool, flipping your comb after each pass through, like pictured below:

Once all your wool is off the comb you started with and onto the other, removing any small pieces of wool left on your comb. Keep doing this until your happy with how clean your wool is. To remove your wool you have two options, one is to just take the whole thing off in one piece or, you can make combed top by running it through a diz (we use a sewing machine bobbin as a diz and it works well) as you take it off, like pictured below:

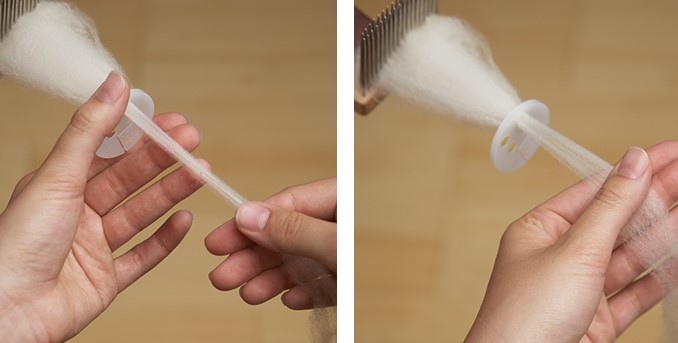
If you do it this way, you are ready to spin your wool into yarn, if not it’s time to card.

Step 2: Carding your wool

There are two different ways to card, either with hand cards or a drum carder. We have done it both ways and prefer drum carding.

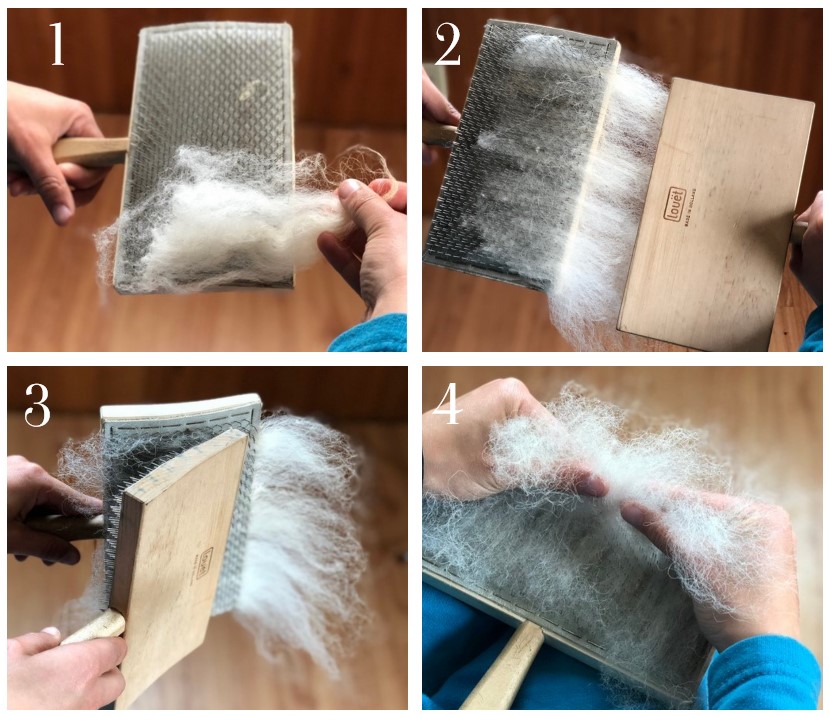
We’ll start with using hand cards: Spread the wool on the left card, with the shorn ends at the top of the card. Take the right hand card and lay it in the center of the left hand card, facing opposite directions. Draw the right hand card away from you. Repeat this several times until the fiber begins to align themselves. When the fibers are well aligned lay the right hand card on your knee, and with the handles in the same direction, brush away from yourself. This puts the wool all on your right hand card. Switch cards and repeat this several time. Roll the wool off the card. Your wool is ready to spin into yarn!

Drum carding: Put wool on the feeder in front of the little drum, turn the handle to feed the wool through onto the big drum. Keep adding more wool until your big drum is full and fibers are aligned. To remove your wool from your drum, turn your handle until the groove in your big drum is on top. Next, run a knitting needle down the groove, pulling up to separate the wool. Fold the off the drum turning the handle the opposite direction of the way you did when carding. Once your batt is off, divide it into three inch pieces.

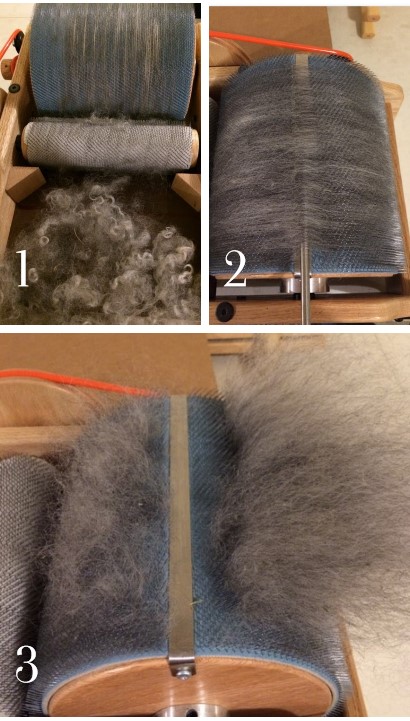
Run it through on piece at a time, once your finished running it through the second time, it’s time to take it off and spin it!

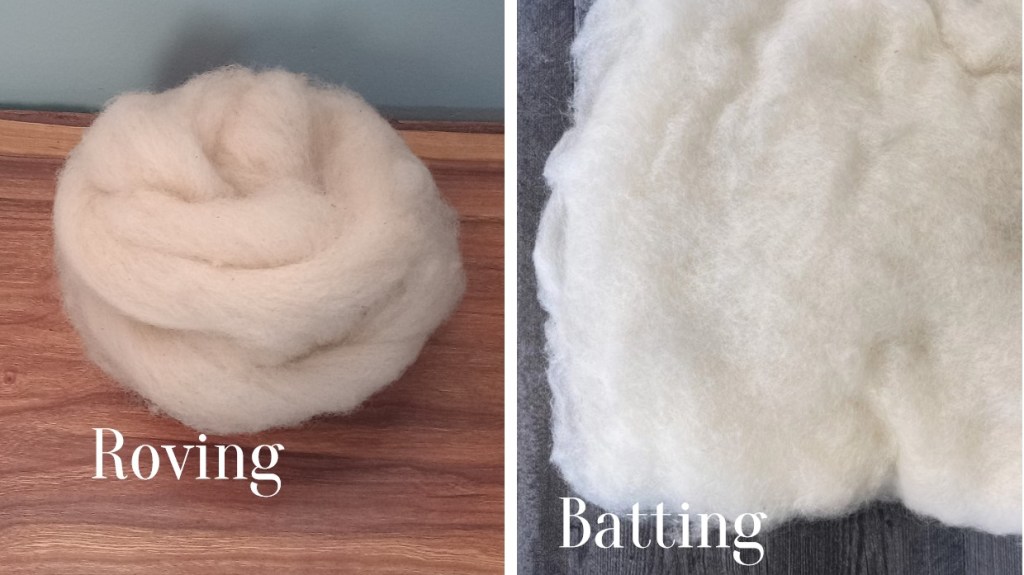
Again there are two ways to take your wool off the drum. First is to take it off just like you did when you took it off to run it through the second time, in one big batt. The second is to make roving out of it by using a diz pictured below:

Making roving: To make roving you start at one end of the drum put your knitting needle in the groove about a 1/2 inch and pull put breaking your wool apart. Put your wool through your diz using a crochet hook. Gently pull your wool through your diz and off your drum, turning your drum as you go. Keep working your way across the drum. Once your finished, roll your roving into a ball and your ready to spin!

Working With Wool Pt.1- Picking, Washing & Drying

She seeketh wool, and flax, and worketh willingly with her hands.

Proverbs 31:13

There are different ways to wash wool. The way explained here is what we use, and what works best for us.

What you’ll need:

Wool

Containers

Water, hot and cold

Soap

Mesh Laundry Bags (optional)

Place to dry

First, we choose how much wool to wash. Some people wash a whole fleece in a bathtub. We used to do this, until we clogged a bathtub drain! So, we switched to washing in small totes, like this one pictured here.

Some people wash in kitty litter trays with sifters. This is a good idea because there’s even less agitation this way, and the bottom of your wool gets rinsed better.

Before washing we pick out any big pieces (in fiber circles, this is called ‘Vegetative Matter’ or ‘VM’*.) This removes the temptation of trying to take out any pieces while your wool is wet. You don’t want to do that, because the more you agitate your wool, the more likely it is to felt it. *A term to describe all grass seeds and burrs found in wool.

Fill your containers with cold water. Add your wool. You can let your wool soak the water in, or gently press it down. You can let this sit for 15 minutes to overnight, depending on how dirty your wool is.

When finished soaking, dump out your water, if your using a tote, gently place your hand over your wool and dump out your water. If your using a litter tray, lift out your sifter, and place it sideways on the tray, (like in the picture below) to let the water drain out, then dump out your water.

Again, depending on how dirty your wool is, you can repeat this process if you want to.

Now it time to soak it in hot water. Fill your containers with hot water. If your using totes, take a cup and fill it with the hot water, and gently pour it over the wool. If using the trays, before putting the sifter back in place, fill your tray with hot water then, put your tray back in place. Let this soak for 15-20 minutes. The goal is to keep your water hot, because if your water turns cold it could ruin your wool. So, to make sure this doesn’t happen it is good to set a timer. That way you don’t go and do something else while your waiting and forget about your wool.

Once the timer goes off, you are going to drain the water and repeat this process one more time, before adding soap.

There are special kinds of soap for washing wool, that don’t sud,and cut grease better than normal soaps, like the kind we use for laundry and dishes. (When the soap suds it is hard to rinse out.) But you can just use dish soap or shampoo,we’ve used both, and they do a good job, just do your best not to get very many suds. The goal is to cut the grease and get the lanolin out of the wool. The Unicorn products have very good reviews for doing this successfully.

Refill your containers with hot water. If your using shampoo or dish soap, add it after you’ve filled your containers and stir without making a lot of suds. You’ll need about 3 TBSP of soap,we just eye it.

Let this sit for 15-20 minutes, remember not to let the water cool.

Drain. Repeat one more time.

Now it’s time to rinse your wool. Refill your containers with hot water, this time don’t add soap.

Let it soak for 15-20 minutes. Drain. Repeat two or three times depending on the amount of soap left in the wool. Drain.

To dry wool, we either set it outside to dry, if it’s not raining. If it is raining, we use a cooling rack and set the wool on it in front of a fan.

Some people put it in mesh laundry bags and put it in the washer on spin, and then lay it out to dry. Now that your wool is out of the water its okay to do this, because it won’t felt now.

Once your wool is dry you can store it in storage bags.

In part two, (coming soon) we’ll explain how to pick and card.

Natural Remedies: Toxemia/Twin Lambing Disease in Sheep

Prevention, Symptoms, and Treatment

PREVENTION AND CAUSE

The best prevention is to keep your sheep’s minerals up, especially calcium, so it doesn’t happen in the first place. The cause of the disease is inadequate nutrition during pregnancy, and not enough nutrient and minerals for the ewe and the lambs.

SYMPTOMS

Symptoms include: lack of appetite or going off feed totally, no energy toward the end of pregnancy, sweet smelling breath, muscle twitching, poor muscle control and poor balance, head hangs low/droops, and grinding teeth.

If you start to see a ewe have these symptoms, take action RIGHT AWAY! If you don’t she could lose her lambs and/or die herself.

It is important the help her QUICKLY!

TREATMENT

Take her away from the flock, and keep her by herself. Keep her where you can monitor her frequently. You must do the following, even through the night, to save her and the lambs lives.

Give her 8ml of Nutri-Drench ASAP, every 2 hours

Nutri-Drench is something we keep on hand on our ranch, all the time. We give it to any animal that is feeling under the weather and to newborn lambs, kids, and calves.

Also give one teaspoon of Natural Vitality Calm plus Calcium in water, every 2 hours.

Feed free choice (as much as she once available at all times) Kelp and all the good quality hay she will eat with molasses on it. Since this disease is related to low blood sugar, the molasses is important to help keep it up.

You also want to give her free choice grain, until she gets her appetite back.

It is important to also give her Vit B shots, this will stimulate her appetite. Give the amount the instructions on the bottle recommend. We gave it 2-3 times a day, until she started eating again, and then gave it once a day for a until she lambed.

CONCLUSION

This is what we did for one of our ewes when she had this sickness. We are thankful to God, that she recovered and her and her lambs survived. She had two beautiful ewe lambs.

REMINDER

The next year, we learned, and kept her up on her minerals. She had twins again, but this time with no troubles at all. Praise Yehovah! Remember, if you keep their minerals up, this won’t be a problem.

We set minerals out for them to have free choice. These are the minerals we use. Click on the mineral for a link to where you can find them.

Kelp (depending on how much you have out, they usually have this one empty right away!)

Copper Sulfate (sheep do need copper, and will take what they know they need)

Redmond Livestock salt

Dolomite (make sure the calcium content is higher than the magnesium content),

Yellow dusting sulfur

We also feed Non-GMO alfalfa pellets (high in calcium) with their grain ration (Non-GMO Corn/Wheat) for the last six weeks of pregnancy, to help keep up their calcium levels and prevent blood sugar problems and toxemia.