Making Soft Flour Tortillas From Scratch

Makes about 20-8” tortillas

We’ve tried many different tortilla recipes over the years. Many times we’d end up with tortillas that were too hard, not flexible, or too thick. We’ve been using this recipe and found it to work best, and we no longer have any of these problems. If you find you have any of these problems, go back through the recipe; you may have missed a step or over worked your dough.

Ingredients:

4 cups flour + extra for counter

2 tsp real salt

1 1/3 cups warm water

8 TBSP melted butter (1 stick)

  1. Put flour in medium size bowl. Add melted butter and mix well.
  2. Dissolve salt in warm water. Pour most of the salt water in and mix until a shaggy dough forms. If your dough is still a little dry add the rest of the water.
  3. Once your dough comes together, put it on a floured counter and knead for about 5 minutes. Lightly oil your dough and place a bowl upside-down over it. Let rest for 15 minutes or up to 1 hour. (Letting your dough rest makes it easier to roll out your tortillas.)
  4. Divide your dough into small balls. On a floured counter, roll out each ball. You can roll them all out and put parchment paper in between each tortilla, or, like we do, you can roll the next one out while you have one cooking in the skillet.
  5. Heat a skillet (cast iron is best) on medium-high heat until really hot. Once your skillet is hot, carefully, put a tortilla in and turn your heat to medium-low. Let cook for about 25 seconds. You should see bubbles starting to fill with air. Flip over and let cook about 10-15 seconds.
  6. Put your cooked tortilla on a plate and continue to cook the rest of your tortillas. Adjust heat as needed.
  7. Store your leftover tortillas in a Ziploc bag. These are softest when warm so if you want to fold them, we recommend warming them back up.

Making Vinegar Cheese

Hast thou not poured me out as milk, and curdled me like cheese?

Job 10:10

In our family, we usually don’t have a lot of leftover milk from our Milk Goats or Milk Cow. But, if we ever start getting quite a few gallons backed up, we like to make vinegar cheese!

It is one of our families favorites, and has a higher, better tasting yield when made from milk a few days old (but not sour).

Here is the recipe we like to use, and that works best for the amount we usually have that needs converted to cheese. You can half or double it and get the same result.

Homemade Vinegar Cheese

*Have your ‘candy’ thermometer on hand to monitor temperature

1 gallon milk (goat or cow)

1/2 c. White Vinegar

2 tsp. Real Salt

Pour your milk into a large pot and turn your stove on medium heat. Stir your milk and check the temperature frequently to keep it from scorching. When it reaches 180°, turn off your burner and add in your white vinegar. Cover with a lid, and set your timer for 20 minutes.

When your timer has went off, remove the lid. You should be able to see that the curds have separated from the whey.

Line a colander/strainer with cheese cloth/butter muslin, and pour your curds and whey into it. Tie the top of your cheesecloth/muslin and hang. (If you haven’t made cheese before, remember to put a bowl or pot underneath your hanging curds; this is to catch the whey as it drains out.)

You can let your curds hang for 1-24 hours. We like to just let it hang for an hour or two. The longer you let them hang, the drier the curds are. We just prefer ours more moist.

You can also take this recipe, and instead of hanging the curds, squeeze out most of the whey and put the remaining curds in a bowl. You can then add a little cream, and have something similar to cottage cheese. We enjoy it both ways.

Making Your Own Butter at Home (Without a Churn)

“Surely the churning of milk bringeth forth butter…” Pr. 30:33

One of the joys of having a family milk cow is all the different uses of the milk. In our home, we use a lot of butter….and we like fresh, raw butter the best.

Instead of shaking the cream in a jar for a few hours, we found the following way that is easy, works quickly, and we get the same result!

Step 1:

The first step is to skim the cream off your milk that has set in the fridge, preferably at least overnight. Take your cream and put it into a quart jar. Set your cream out until it reaches room temperature. If it is too cold, it will take much longer to turn into butter.

Step 2:

Pour your cream into your food processor, up to the ‘max liquid’ line. Put your processor on medium speed. DO NOT leave your processor. If your cream goes too long, it will turn into butter, and then go back to liquid again. After it goes back to liquid again, it is very hard to get it to go back to butter the second time.

Watch your cream closely, and you will see it begin to ‘gather’. At first, it will go through the stage where it looks like Cool Whip; don’t stop it here, let it keep going. You will see it turn yellow, and the buttermilk will be the liquid that is left. Stop it here! Take off your lid, and you will be able to see clumps of butter floating around, stuck to the sides or middle.

Step 3:

Drain off your buttermilk into a jar (if you want to keep it) and put your butter into a bowl. Press it down with a spoon, and you will see more buttermilk come off; Pour it out of your bowl. Continue to do this until you press and no buttermilk comes out.

Step 4:

When you are finished, and no more buttermilk comes out upon pressing, rinse your butter with cold water, pour it off, and pat it dry.

Step 5:

Salt your butter (if you like it salted), and it is ready to enjoy.

Making Homemade Hummus

When you make your own hummus, it just tastes better!

For starters, you need garbanzo beans. They are the base ingredient in hummus.

If you are starting with dry beans, you need to measure out 2 cups. Put them in a bowl, and make sure there is room in the bowl for them to expand. Cover them with water, and let sit for 24-48hrs. If you let them sit for 48hrs, you want to drain off the water and refill it after the first 24hrs. (If you buy canned garbanzo beans, skip this process, and just use two cans, as they are precooked)

Once they have finished the soak, drain and rinse them. Put them on to boil in a stock pot until they are soft. This usually takes about 3-3 1/2hrs.

After they are done boiling, rinse them again. If you like a more creamy textured hummus, take of the little peel around each bean. This is pretty easy, but it is tedious and does take awhile. If you don’t mind a nuttier texture, you can leave the peels on.

After you are done, put your beans in your food processor, and process them until crumbly in texture. While your processor is running, add in the water, olive oil, and tahini. (We like the tahini imported from Israel, Simple Truth Organic) Process until it has that hummus texture.

Pour your hummus into a bowl, and add in the salt, and lemon juice; stir until well mixed.

Top with paprika, and any other seasonings of your choice. You can also add more olive oil to the top if you like.

Enjoy!

How to Make Your Own Sauerkraut at Home

Whether therefore ye eat, or drink, or whatsoever ye do, do all to the glory of God.

1 Cor. 10:31

When you make your own sauerkraut at home, it contains many more health promoting benefits. You don’t want to pasteurize it and kill all the good bacteria in it.

8 reasons to eat more sauerkraut: (1)

1. Enhanced nutrient availability 

2. Reduced gas production 

3. Increase in acetylcholine 

4. Increase in lactic acid 

5. Spike in vitamin C

6. Spike in vitamin K2

7. Immune support 

8. Spike vitamin U

What you’ll need:

3 heads of cabbage

5 TBSP salt

Water

Crock

Cut your cabbage in half, then quarter. Take out the core with your knife.

Slice your cabbage VERY thin. (Think about the thinness of sauerkraut.)

There are a few different ways to slice/shred it.

  1. Take a big knife, and shred/slice very thin.
  2. Shred the cabbage with a cheese grater
  3. Put your shredding blade on your food processor and run it through.

After you have your cabbage shredded thin, put it in your crock. Add salt.

Now, punch down your cabbage with your fists, (you can also use a tool made for this, or a thick wooden spoon) until it becomes softer and you get the juices to come out.

The juice should end up covering the cabbage. But, if for some reason, your cabbage is soft and just not juicy enough to have juice covering itself; add water to finish covering it. You want there to be an inch or so of water/juice over the top of the shredded cabbage.

Take a plate that will fit inside of your crock and place it upside-down inside of your crock. Put a jar full of water (with a lid, of course) over the top. You want this to wait down and put pressure on the plate. Cover entire crock with a towel, and let sit in a cool dark place for 4-7 days. Some crocks come with lids, these will work just as well. You will be able to tell when it is ready when it smells/tastes like Sauerkraut!

Put your sauerkraut in glass jars, and store in the fridge. It will keep in the fridge for 4-6 months.

How to Make and Can Apple Pie Filling

Start by washing your apples. Once that is done, peel, cut, core and slice.

Put these slices into a large stockpot. If your apples are really dry, you need to add about a quart or so of water to a very large stockpot full. If your apples are very juicy, you need little to no water. You will have to gauge it by the juiciness of your apples, so that they do not burn. Stir continually.

Shut them off when they are mostly cooked, but still a little hard.

To a large stockpot, add:

4 cups Brown Sugar

3 Tbsp Lemon Juice (optional)

2 tsp. Cinnamon

1 tsp. Nutmeg

Warm water if very thick until it reaches desired consistency

Canning Preparation:

Fill your canner half way with water, and turn on. Put your empty jars in your oven on ‘warm’. If your oven doesn’t have a ‘warm’ setting, just put it on the lowest setting it has.

When everything is hot/warm, you are ready for the next step.

Fill your hot jars with the hot filling, leaving an inch of head space in the top of your jar. Pack filling tightly into jar. Put a butter knife down the insides of your jar (between the glass and the sauce) to let out any air bubbles in the jar/filling. Wipe your rims clean with a rag or paper towel to remove any filling. If you don’t do this, it can prevent your lids from sealing tightly to your jar.

Put on your pre-warmed lids and screw on your rings tightly. Put your jars into your warm water in your canner, with a jar lifter, pictured below.

Canning/Water Bathing

When all the jars are in the canner, you want there to be about 1” of water covering the top of all jars. Put your canner lid on, but do not lock it. Watch for when water starts to boil. When it does, turn heat to medium, and set your timer for 25 minutes.

When timer goes off, shut off canner. Let sit for 5 minutes.

Place a towel on your counter. Take your jar lifter, and carefully remove your jars from the hot canner and onto your towel. Do not tighten your rings if they loosen.

Let cool for 12 hours. Check seals and store.

The reason you want to check the seals is to make sure they are all secure before you store them.

You check the seals by tapping the jar lids with one finger. As you tap them, listen for a jar that sounds different than the rest of them. It will usually make a hollow sound.

If you find a jar that hasn’t sealed, put it in the fridge and use it soon. If you are planning more canning, you can try to can it again. Make sure there are no nicks in the top of jar and a good lid on it.

How to Start, Grow, Harvest and Preserve Your Own Sweet Potatoes

Starting Your Slips

In mid-winter take your best sweet potato and put it in a quart canning jar filled with water. (DO NOT CUT YOUR POTATO!)

Don’t have a sweet potato you grew? That’s okay, just get a couple from the store.

Set your canning jar in the window sill. Change the water every few days, or when the water begins to stink.

After about 3 weeks, your sweet potato will start to sprout. Once your sprouts/slips are 3”-4” tall and leafed out, snip off the slips and put them in a pint jar of water.

Once they are in the jar of water, they will start growing their own roots.

If the slip or root growing process seems to be taking awhile, adding some compost to the water helps to speed up the growth.

Once your slips have grown roots that are 2-4”, they are ready to transplant.

We have found that it works best to plant them in a pot of dirt that is VERY wet.

This prevents them from going into shock, by just going straight from the jar of water, into the garden.

You want to keep them in your pot of wet dirt for at least 5-7 days, longer is okay.

If it is still cold outside, keep this pot indoors in a window sill as well.

Planting Sweet Potatoes Outside

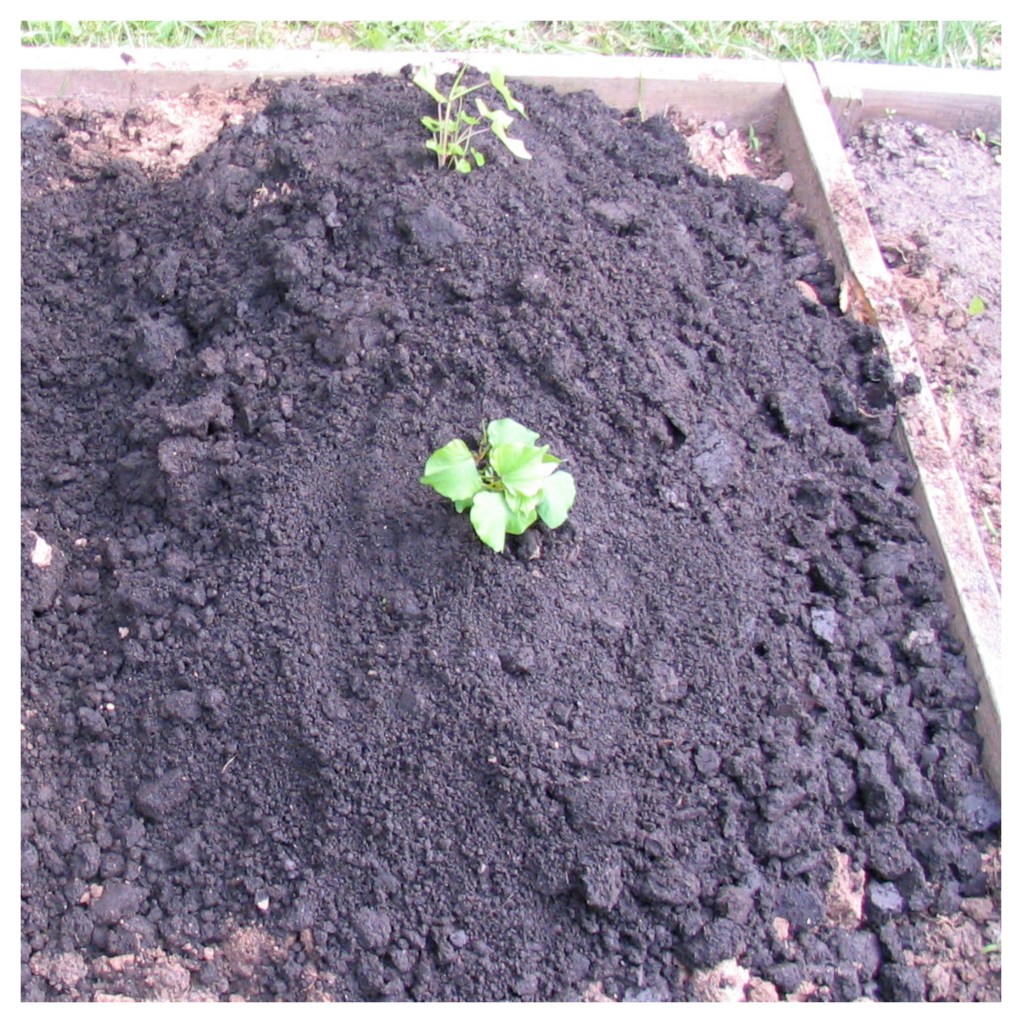
You want to plant your slips outside after your last frost date. With your hoe, make small hills about 1′ around and 1′ high.

With your hoe handle, make a 4” deep hole in the center of your hill. Take your slips (we like to do 3-4 per hill), spread out the roots and cover with dirt. Then top your hill with compost.

Watering

Water WELL everyday until plants are established. This is VERY IMPORTANT!

Once established water a couple times a week (unless it rains, of course).

Pests

There are many garden pests who will attack your potato vines. These include sweet potato weevils, sweet potato beetles, wireworms, flea beetles, and blister beetles.

If any pests attack your sweet potato plant, spray Neem oil (organic spray) 1-2x per week, or more depending on how bad the bugs are and how much damage they are causing.

If it is blister beetles that are eating your sweet potato plants, remove them WITH GLOVES (THEY DO GIVE BLISTERS) into soapy water. You will have to be on top of it checking daily, or several times daily, until they are gone. Otherwise they WILL destroy your plants.

Feeding the Plant

If your sweet potato leaves are looking a little yellow, or just not growing well, you need to feed the plant. You need to add compost around the hill and plant. It is also a good idea to put hay or mulch around the hills in the dry season, to keep the moisture in.
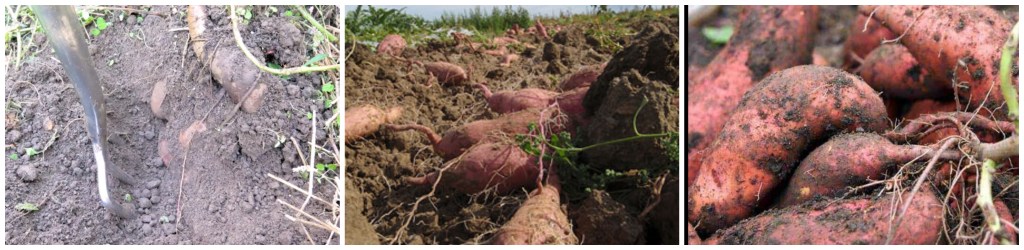
When to Harvest

Harvesting is an exciting time, and a time to be thankful to God for what He has blessed us with. Ecc. 3:13 says, “Every man should eat and drink, and enjoy the good of all his labour, it is the gift of God.”

Before your first frost date (it is alright if the plants get frosted on, just make sure they don’t get frosted on repeatedly.)

Take a potato fork and dig up the hills, being careful not to dig the fork into the potatoes themselves.

Carefully brush off any dirt with a soft bristled brush, making sure you do not remove or scratch the skins.
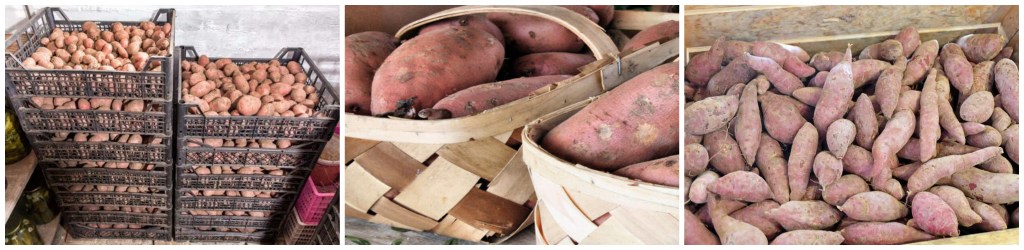
Storing

Store them in a cool, dark place to let them cure for about two weeks. You can begin using them after this time; but they longer they cure, the sweeter they will be!

Preserving

If your sweet potatoes are not keeping well, for whatever reason, you will need to can them.

Prov. 12:27 says, “the substance of a diligent man is precious.” We don’t want what is ‘precious’ to us to go to waste!
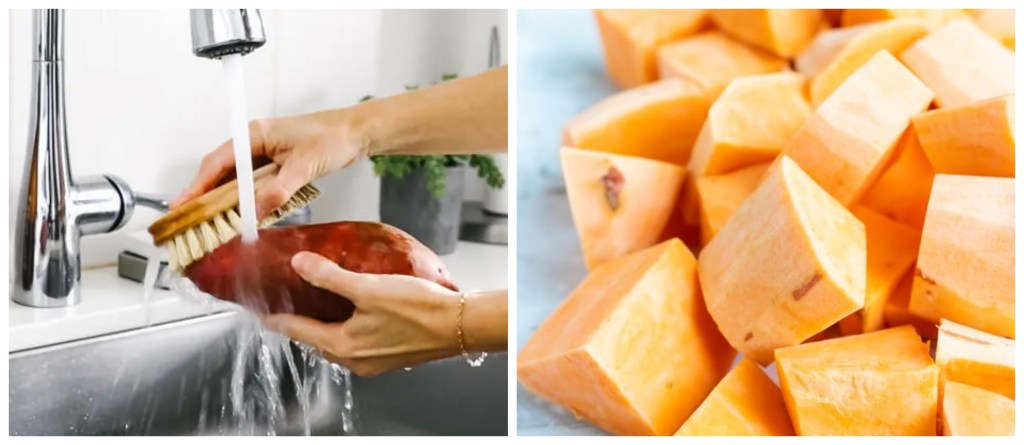
Canning

You begin this process by washing the potatoes well. Cut them into bigger chunks, (you can peel now, or after the boil) put them into water and bring to a boil. Let them boil for about 10 minutes, then remove from heat. Do not strain the water out of the potatoes; you are going to use it in a moment.

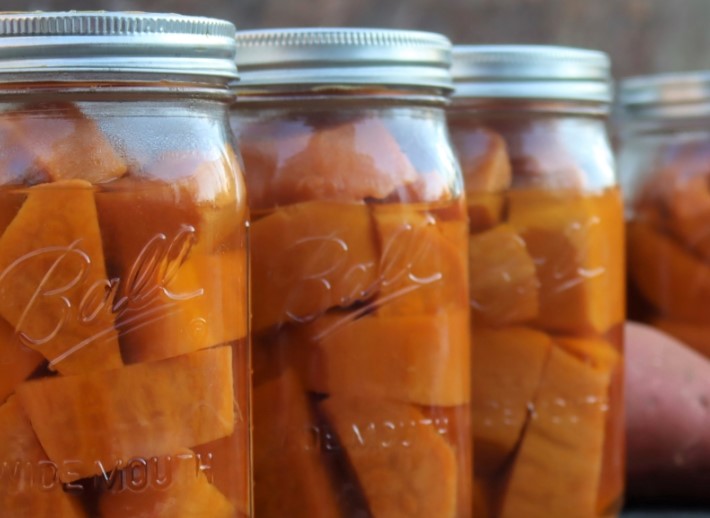
Take the potatoes out of the water with a slotted spoon. If you did not peel them beforehand, you can slip them off now. Fill the jars with the peeled potato chunks.

Ladle the water you boiled them in over the potato chunks, leaving 1” head space between the water and lid. Put your lids and rings on the jars tightly.

Place your jars in the canner with hot water, and slide the lid into ‘lock’ position. Once steam starts to come out of the vent pipe, set your timer for 10 minutes.

When your timer goes off, and your ten minutes in up, put the weight on, and let the pressure build up to 10psi.

If you used pint jars, keep at 10psi for an hour and 5 minutes.

If you used quart jars, keep at 10psi for an hour and a half.

When the time is up, let cool as the pressure comes out. When all the pressure is out (your psi is back to zero) Remove your jars from the canner. DO NOT re-tighten bands if they came loose.

Allow to continue cooling for about 12 hours or so.

Check your seals (use any if they didn’t seal, soon) and store.

DON’T FORGET! Save some of your potatoes to start your slips in mid winter! Then you’ll never have to buy slips from a greenhouse again! 🙂

What to do with Canned Sweet Potatoes?

You can heat them up straight from the jar, mash, and put cinnamon and butter on them, or you can add them to soup.

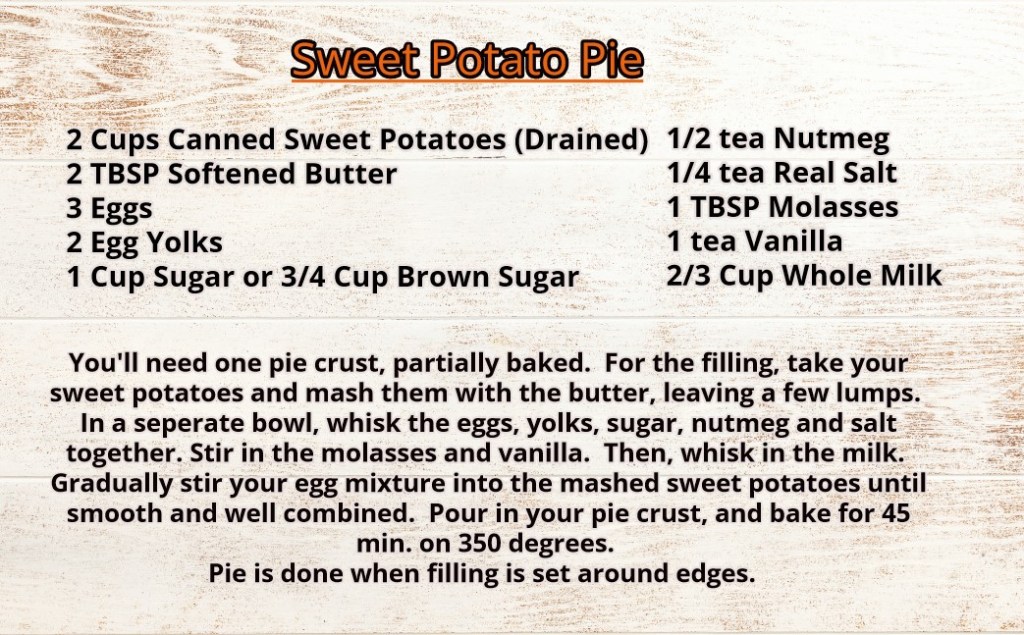
Have you ever had Sweet Potato Pie? If you like Pumpkin Pie, Sweet Potato Pie is just as good. Some in our family would say EVEN BETTER!

Here is our family’s favorite recipe: